Fortigate Hotspot Setup
Fortigate Hotspot Setup
Home > Fortigate Hotspot Setup

Fortigate Hotspot Installation Guide
1. Select Fortigate as the Brand by saying Add a new router from the Obifi panel.
2. After entering a name, proceed to the next step with the, Save button.
3. Note down the information given on the next screen. Then login to the fortigate management interface.
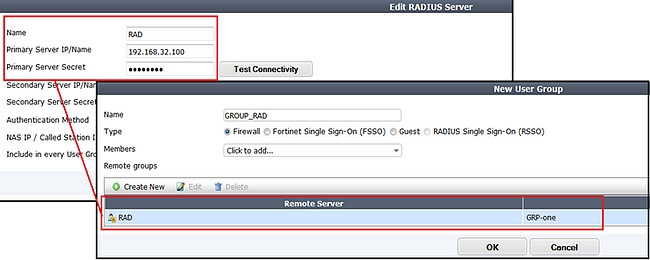
1. User & Device > Authentication > RADIUS Server > Create New -follow these steps.
2. Enter a name for the Radius server, fill in all other fields with the information provided by the Obifi panel.
3. User & Device > User > User Groups > Create New -follow these steps.
4. Give a name for the group, Select the Radius Server you added as a Remote Server.
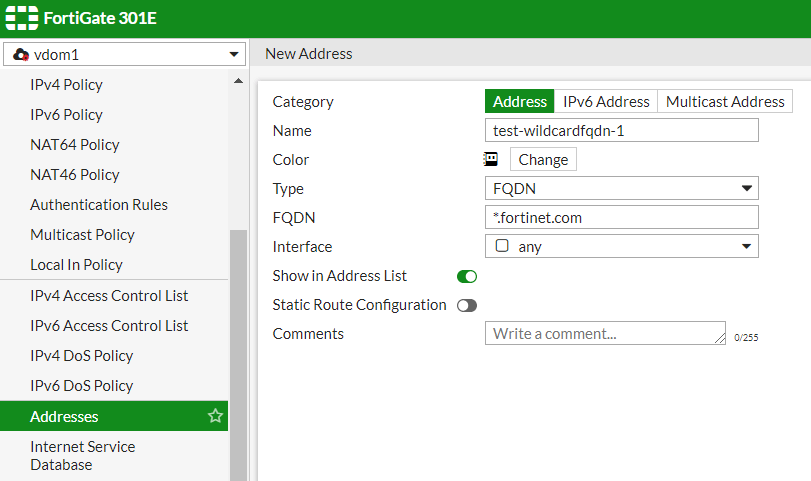
1. Policy & Objects > Objects > Addresses > Create New -follow these steps.
2. For Type- select FQDN.
3. For FQDN- enter *.obifi.com .
4. For FQDN- enter *.obifi.com ..
5. Save with the OK button.
1. System > Config > Replacement Messages > Extended View follow these steps.
2. Change the fields in this section as shown on your obifi panel.
1. System > Network > Interfaces- From this section, select the interface you will broadcast hotspot from.
2. Select Security Mode Captive Portal.
3. Select Authentication Portal Local.
4. Select the User Group you entered as User Groups.
5. For Exempt List, select the obifi FQDN policy you added as.
6. Select all as Source Address.
7. Select wan as Outgoing Interface.
8. Select Wan Interface as Outgoing Interface.
9. Destination Address- select the obifi FQDN policy you added.
10. Select always as Schedule.
11. Select all as service.
12. Select ACCEPT as Action.
13. Select ON as NAT.
You have successfully completed the Fortigate hotspot setup.